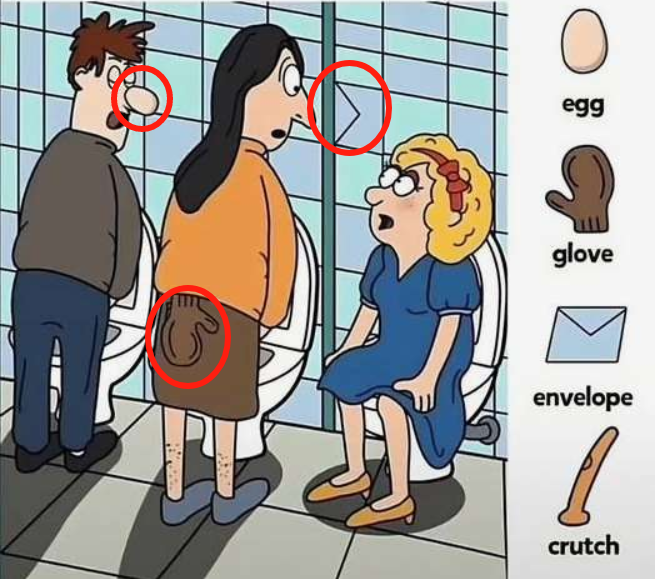
The internet is filled with brain-teasing challenges, but every now and then, a puzzle emerges that leaves even the sharpest minds baffled. One such image has recently gone viral—an illustration that asks viewers to find four hidden objects: an egg, a glove, an envelope, and a crutch. Sounds simple, right? Think again.
At first glance, it looks like an ordinary bathroom scene, but hidden within the artwork are objects so cleverly disguised that most people miss them entirely. Do you have what it takes to spot them all? Let’s dive into this tricky puzzle and break it down step by step.
Can You Find the Four Hidden Objects?

Take a close look at the image above. Somewhere within this seemingly normal scene, four everyday objects are hiding in plain sight. Your challenge? Find the egg, glove, envelope, and crutch before reading further.
Don’t be too quick to assume you’ve spotted them all. Many people rush through the puzzle and overlook key details. Do you trust your observation skills? Let’s test them!
Common Mistakes That Trip People Up
Many participants find themselves stuck on this puzzle for a few reasons:
- Overconfidence in First Impressions – Most people assume they’ll find all four objects in seconds. However, the trick lies in the clever way they’re blended into the scene.
- Ignoring Camouflage Techniques – The objects aren’t just “placed” in the picture; they’re hidden by color matching, shape manipulation, and strategic positioning.
- Focusing Only on the Main Characters – While the people in the illustration draw attention, the hidden objects are placed in unexpected locations.
- Giving Up Too Quickly – Some people get frustrated and stop searching before truly analyzing the details.
If you’ve fallen into one of these traps, don’t worry—you’re not alone! Now, let’s break down the puzzle and reveal where each object is hiding.
Video : Find the 4th object
Step-by-Step Breakdown: Finding Each Hidden Object
1. The Egg – A Sneaky Facial Feature 
Location: The egg is cleverly hidden as part of the nose of the man standing on the left side of the image.
At first glance, his nose seems normal, but upon closer inspection, it becomes clear that it has been shaped and shaded to resemble an egg. This is a classic example of camouflaged placement—where an object blends seamlessly into another element of the scene.
Many people fail to spot the egg because they assume they are looking for a traditional, standalone egg. However, this puzzle plays with expectations, making the challenge even more difficult.
2. The Glove – Hidden in the Clothing 
Location: The glove is subtly incorporated into the skirt of the person in the middle.
At first, it appears as just a fold in the fabric, but if you focus on the shape and outline, you’ll see that it’s a perfectly formed glove. The designer of this puzzle used color blending to make the glove look like part of the skirt, tricking the eye into overlooking it.
This is a common technique in optical illusions—using shadows, textures, and positioning to make objects “disappear” into their surroundings.
3. The Envelope – Hiding in the Tiles 
Location: The envelope is disguised as part of the bathroom wall tiles behind the woman in blue.
Unlike the other objects, which rely on shape manipulation, the envelope blends in using color and symmetry. The white tiles create a perfect backdrop, making it difficult to recognize the faint outline of an envelope.
The trick to spotting this one is to change how you look at the image. Instead of focusing on what you expect an envelope to look like, scan the background for anything slightly “off.” That’s where the hidden envelope reveals itself.
4. The Crutch – A Difficult One to Spot 
Location: The crutch is cleverly placed near the bottom right of the image, blending into the chair legs.
This is perhaps the hardest object to find. Most people assume a crutch would be near the people or propped against the wall. Instead, the artist merged it with another element of the scene, making it appear as part of the background furniture.
To find it, you have to look at angles and lines that don’t quite match up with the rest of the objects in the room. Once you notice the slight curvature and the different shading, the crutch stands out.
What Makes This Puzzle So Challenging?
This puzzle is a perfect example of how our brains process visual information. When looking at an image, we naturally focus on key elements—faces, objects in the foreground, and high-contrast details. However, our brains tend to overlook background details that seem unimportant.
This is why the puzzle is so tricky. The artist deliberately placed the objects in unexpected locations and used visual tricks to blend them into their surroundings. Our brain struggles to separate what is “important” from what is “hidden,” leading to the difficulty in spotting all four objects.
The Fun of Optical Illusions and Hidden Object Puzzles
This type of puzzle isn’t just entertaining—it also helps train your observation skills and attention to detail. Studies have shown that engaging in visual challenges like this can:
- Improve focus and concentration
- Enhance problem-solving skills
- Strengthen pattern recognition abilities
- Increase patience and persistence
So, the next time you find yourself struggling with a hidden object puzzle, remember—every moment you spend searching strengthens your brain!
Video : Find 4 hidden objects
Final Challenge: Can You Find the Objects Faster Than Others?
Now that you know where each object is hidden, share this puzzle with your friends and family. See how quickly they can find all four objects. You might be surprised—some people will spot them instantly, while others will take much longer!
 How long did it take you to find them? Share your answer in the comments!
If you enjoyed this challenge, be sure to check out more mind-bending puzzles and hidden object games to keep your brain sharp and entertained. Who knows? The next puzzle might be even trickier!
Now, Are You Ready for Another Challenge?
Stay tuned for more exciting brain teasers and visual puzzles. In the meantime, keep training your eyes—you never know when you’ll need them for the next mind-blowing illusion!
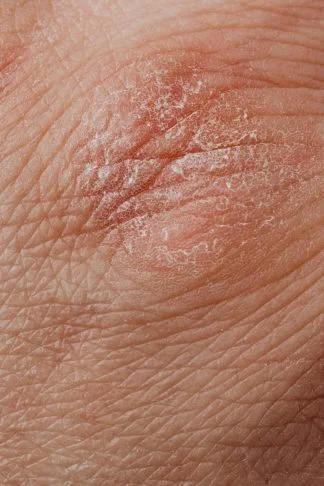
9 Powerful Natural Solutions for Dry and Flaky Skin
Dry, flaky skin can result from various factors, including genetics and aging, which naturally predispose some individuals to this condition. If left untreated, dry skin can crack, increasing the risk of infections. Fortunately, there are many remedies and lifestyle adjustments to help restore and maintain hydrated, healthy skin.

Shower Smarter

Frequent washing can strip the skin of its natural oils, making it more prone to dryness. To lock in moisture and protect your skin:
- Use lukewarm water: Avoid hot water, which can exacerbate dryness.
- Pat dry gently: Use a towel to pat your skin dry instead of rubbing.
- Moisturize immediately: Apply moisturizer while your skin is still damp to seal in hydration.
- Shave wisely: Always use shaving gel and a sharp razor to reduce irritation.
Combat Winter Dryness
Winter weather is particularly harsh on the skin due to cold air and frequent handwashing. To minimize its effects:
- Wear gloves: Protect your hands outdoors and while performing tasks like dishwashing.
- Use a humidifier: Adding moisture to indoor air can prevent dryness, as recommended by dermatologists.

Natural Remedies for Dry Skin
1. Olive Oil
Extra-virgin olive oil is rich in vitamin E and antioxidants, making it effective for repairing dry skin. Apply sparingly to dry areas such as elbows or mix it with a face mask for added hydration. Avoid overuse, as it may weaken the skin barrier.
2. Oatmeal Baths
Adding a cup of oatmeal to warm bathwater can hydrate and soothe irritated skin. This remedy also alleviates itchiness and discomfort caused by dryness.
3. Coconut Oil
Coconut oil works as a natural moisturizing cream. Apply it to chapped hands, feet, or heels before bed for intense hydration. For better results, wear gloves or socks after application.

4. Milk Compress
Milk contains lactic acid and anti-inflammatory properties that can soothe and gently exfoliate dry skin. Soak a clean washcloth in cool milk and apply it to affected areas for 5–10 minutes. Avoid this method on cracked skin.
5. Aloe Vera
Aloe vera is known for reducing redness, irritation, and dryness. Its mucopolysaccharides, similar to hyaluronic acid, help retain moisture. Perform a patch test before applying it to larger areas of skin.
6. Honey
Honey is a natural humectant with healing and anti-inflammatory properties. Use it as a spot treatment for rough patches or include it in homemade face masks. Consult a dermatologist before using honey to treat specific skin conditions.
7. Petroleum Jelly
Products like Vaseline or Aquaphor create a protective barrier to lock in moisture and prevent chafing. Petroleum jelly is suitable for sensitive areas like eyelids and lips but should be avoided on acne-prone areas.

Choosing the Right Products
When selecting skincare products, opt for ointments or creams instead of lotions for better hydration. Look for these key features:
- Fragrance-Free: Choose products labeled as “fragrance-free” rather than “unscented,” which may still contain irritants.
- Hydrating Ingredients: Seek out components like ceramides, glycerin, and hyaluronic acid for effective moisture retention.

When to Consult a Doctor
If dryness persists despite home remedies, it may signal an underlying skin condition. Consult a dermatologist for professional care or prescription treatments tailored to your needs.
By following these tips and incorporating natural remedies, you can effectively manage dry, flaky skin and maintain a healthy, glowing complexion.


Leave a Reply